Showing posts with label Bread. Show all posts

Sourdough Bread

Homemade sourdough bread

It all started here and here. First I saw a beautiful loaf of bread on Green Kitchen Stories blog, then I watched a Dutch oven bread video by Kinfolk which suddenly sparked a fire of curiosity inside. That was when I decided I finally had to give it a try. I have been thinking of baking sourdough bread many many times before, but I have never found the right inspiration.

Fast forward a few failures later, I'm proud to announce I finally baked the perfect loaf of bread! A few days before we went to our little vacation in Italy (you can expect a photo heavy blog post soon), I baked my third sourdough bread and I was happy with the result. Actually, I was more than happy. I felt like a  child, dancing, jumping and clapping my hands.

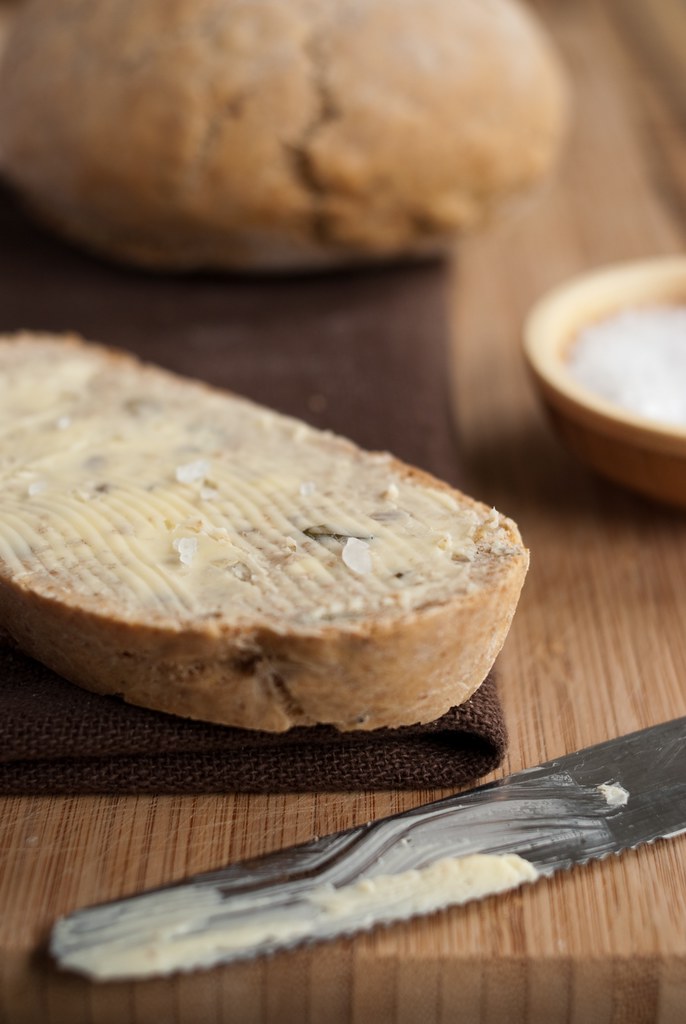
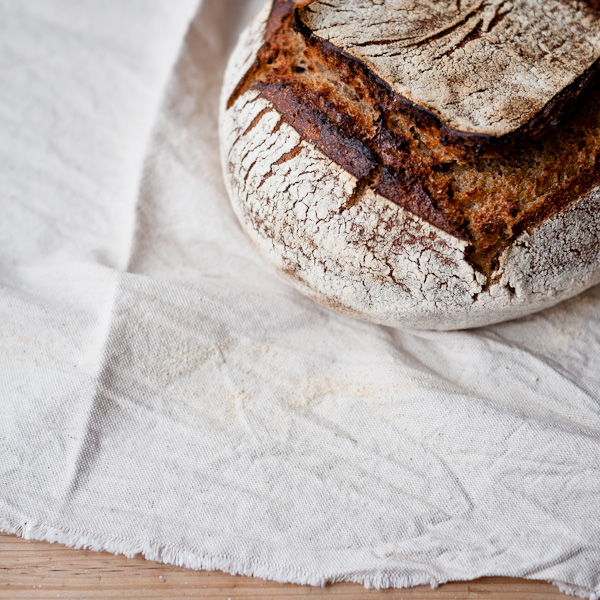
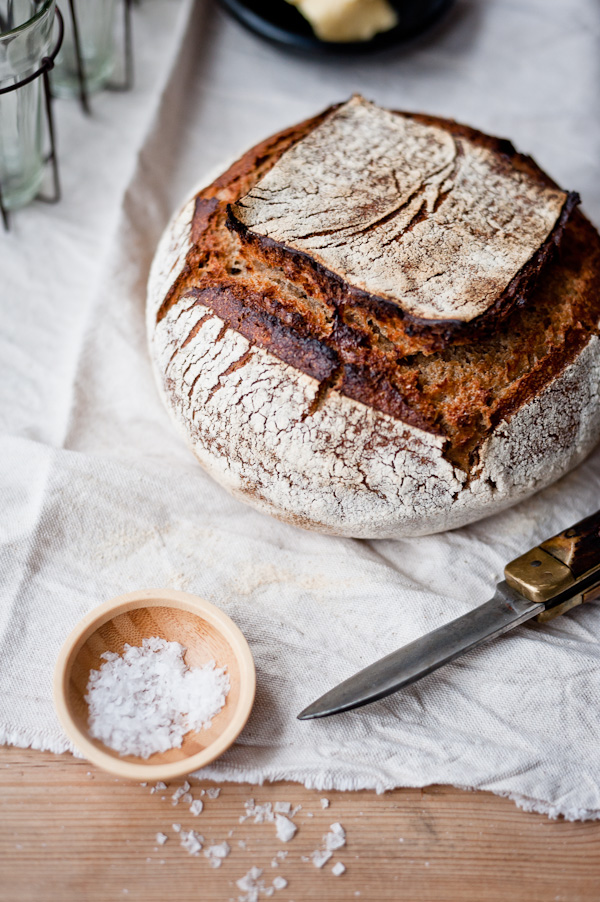
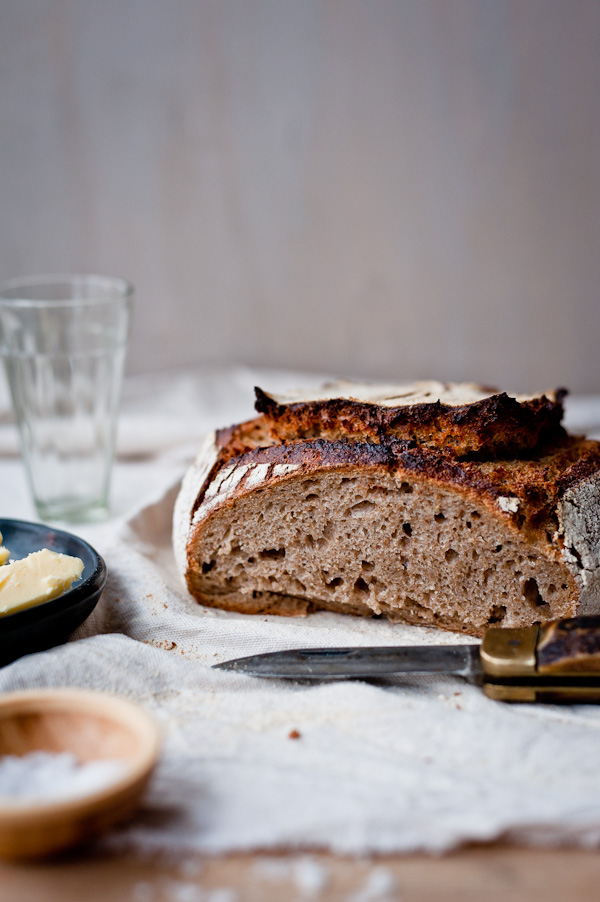
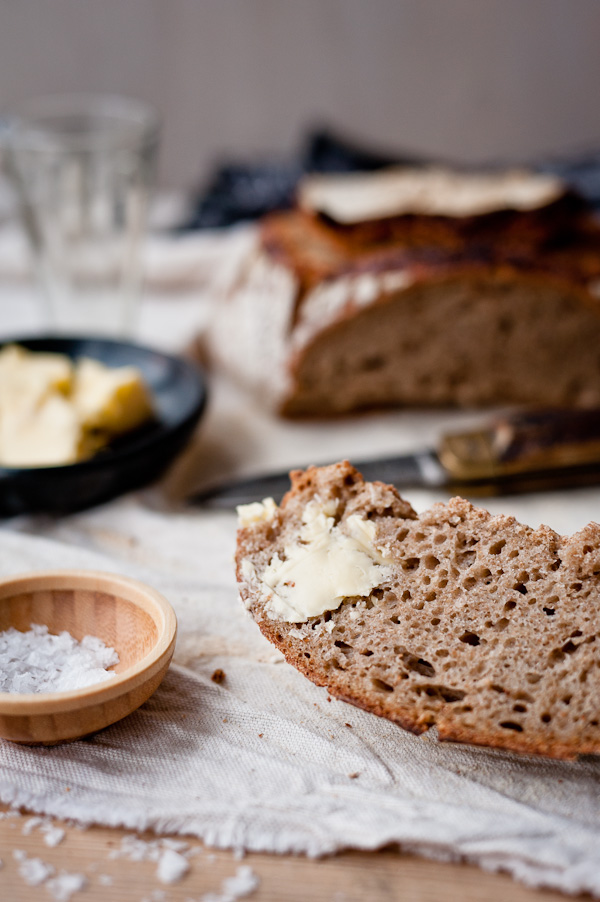
I knew it was perfect the very moment I cut through the beautiful dark brown crust. First, the crackling sound of cutting into fresh bread that I absolutely love, then the aroma - there's nothing like the smell of freshly baked bread. The texture was just right, dense but soft with nice airy holes. All I needed was homemade butter! Bread and butter. The best combo ever.

Sourdough bread and salt

I tried two different recipes and techniques before I found the perfect one that worked for me. I knew I wanted to bake dark bread. I love Scandinavian dark breads. Every time we travel to Finland I bring back a suitcase full of Finnish rye bread and freeze it.

Sourdough starter is obviously one essential ingredient of great bread. I grew my own rye sourdough starter (after a few failures). There's been so much written about growing your own starters already, so I'm not going to repeat what others already said. Instead, I can point you to some good sources like this one or this one. It's also useful to know how to maintain your starter once you get to that point. You will find very useful info here or here.

My bread was inspired by sourdough bread recipe on Wild Yeast blog. If there is anything you want to know about bread baking, you will find it there! I also plan to buy the Tartine Bread book. Not only it was photographed by one of my favourite photographers Eric Wolfinger but it also contains detailed step-by-step instructions and images illustrating the key steps of various techniques.

Rye sourdough bread
Sourdough bread with butter

Sourdough Bread
Yield 1 loaf (1kg)

387g strong bread flour
90g rye flour
280g water
240g rye sourdough starter
12g salt

In a bowl, combine the starter and water. Add the flours and stir with a wooden spoon until all the ingredients come together. Cover and let the dough rest in the bowl for 30 minutes.

Add the salt and incorporate with your hands. Continue to knead the dough in the bowl for about 5 minutes. If the dough is too sticky, lightly dampen your hand with a little water. Cover and let it ferment at room temperature for 1 hour and 15 minutes.

Fold the dough in the bowl. To fold the dough, gently lift one side of the dough, stretch it upward and fold a third toward the centre. Repeat the step with the opposite side of the dough. Turn the dough 90 degrees and repeat with other two sides (this video demonstrates how to fold a dough). This method helps to develop the gluten.

Cover and let the dough rest at room temperature for another 1 hour and 15 minutes.

Transfer the dough to a lightly floured surface and shape into a ball. Cover with a clean tea towel and let it rest for 20 minutes.

Place the formed loaf upside down into a floured banneton (rising basket) or a towel lined bowl heavily dusted with flour. Let the loaf proof at room temperature for 2-3 hours. You can also let it proof for 1 hour at room temperature and them place it in the fridge overnight and bake straight from the fridge.

Preheat the oven to 250℃ for at least 30 minutes to one hour before you are ready to bake. Place your Dutch oven or an oven proof dish with a lid in the oven. The dish must be very hot.

Take the dish out of the oven and sprinkle some flour on the bottom. Remove the bread from the bowl and put it in the baking dish. Slash the top of your bread, place the lid back on top. Bake for 25-30 minutes.
Turn the heat down to 230℃. Remove the lid and bake for another 20-30 minutes, until dark brown.

Let the bread cool for at least 30 minutes before slicing.


Chocolate brioche and Monthly Mingle


Last week I announced my first participation in a blogger event. I joined Coulinary Tour 2010. During the virtual foodie visit in Brazil I found my new sweet passion - Dulce de Leche. You can still join the tour if you are interested and explore new culinary worlds. I've truly enjoyed the event and decided to go on.

I might have already confessed that I have a sweet tooth. My sweet tooth and the fact that I constantly try to improve my bread-making skills inspired me to join another blogger event. This time I chose Monthly Mingle hosted by Jamie from the lovely blog Life's a feast. The theme for this month is Bread & Chocolate. I just could not resist!


To be honest, it took me a while to decide what was I going to bake. Bread and chocolate? I did not want to think about a classical bread. I just didn't like the idea of sweet chocolate bread. But what else can be counted as bread? I found many chocolate bread recipes. I wasn't intrigued by any of those.

I woke up on Saturday morning with a sudden flash of inspiration. Brioche! But... What is brioche? Is it type of bread? I have never tasted it. Again! There are so many goodies I still don't know! I love foodie world. Sometime it is kind of frustrating though. I feel like a kid in the grown-up world. A friend of mine talked about brioche a couple of weeks ago. He said it was delicious. That's all I knew.

Thank you uncle Google. You know everything what I don't know! You helped me again.


Wikipedia. Another favourite site of mine!

"Brioche is a highly enriched French bread, whose high egg and butter content give it what is seen as a rich and tender crumb. It has a dark, golden, and flaky crust from an egg wash applied before and ager proofing."
Source: Wikipedia

Bingo! That's the one I have been looking for. Let's just add some chocolate. Yum!


I liked brioche a lot. I will definitely make it again. I just wonder if I can freeze them. We had a hard time eating 12 rich and buttery brioches. I might also point out that the recipe originally called for kneading dough in a stand mixer. As I don't have one, I had to knead it by hands. I also had to ask P. for help during a phase where recipe said "increase speed to medium-high"! :) Fresh warm brioche with melted chocolate centre was well worth all the effort!


Chocolate Brioche

Ingredients
1/3 cup warm milk
1/3 cup warm water
10 g dry active yeast
450 g plain flour
2 tsp salt
3 large eggs
55 g sugar
300 g butter, cut into small cubes, softened
150g dark chocolate, broken into pieces
1 egg, beaten with 1 tbsp water, for egg wash


1. In a large bowl mix warm water, warm milk, 1 teaspoon of sugar and yeast. Stir until yeast dissolves and let proof for 10 minutes.

2. Add flour and salt and mix with a wooden spoon until flour is moistened. Beat in eggs, adding one egg at a time, making sure each egg is well incorporated before adding another one.

3. Add sugar and keep kneading dough until it comes together. Now comes the tricky part. Mix in butter, adding only one or two cubes at a time, kneading well until each cube is incorporated before adding another cube. This can takes about 10 minutes before all butter is fully incorporated. Dough is fully kneaded when it pulls away form sides of your bowl.

4. Transfer the dough into a clean bowl, cover with a plastic wrap and let it rise at room temperature for 1 hours or until double in size. Lift up dough around edges and allow it to deflate.

5. Refrigerate the dough for 2 hours. Punch the dough down to deflate it every 30 minutes until it stops rising. Cover bowl with a plastic wrap and refrigerate overnight.

6. When you are ready to make brioche, butter a muffin pan or brioche tins you want to use.

7. Take the dough out of the refrigerator and scrape it out on a floured surface. Divide dough into 12 equal pieces. Roll each piece between your palms to form a ball. Flatten each ball of dough and put several pieces of chocolate in the middle of each one. Roll up into a ball shape and place in the pan.

8. Cover the pan loosely with a plastic wrap and let rise for two hours at room temperature.

9. Brush each ball with egg wash and bake in the preheated oven to 180C/fan for 20 - 25 minutes until golden brown.

10. Allow brioche to cool for a couple of minutes in the pan and then transfer onto the cooling rack.


Perfect breakfast with homemade bread


I think I really want to tell you about this. I made my first homemade bread! I was thinking about making homemade bread for a while. Actually, it was since our housemates had moved away together with their bread machine. It has been about 4 or 5 months now. I love the smell of freshly baked bread in the morning. It is very easy to make a bread using a bread machine, however it is less easy using your hands and an oven. I guess, that is why it took me so long to get myself to do it! :)
Even though it did not go that well, it was even more fun. My boyfriend and I were very thrilled how it would be like. I might even share the recipe and you can tell me what was wrong. My first tip, about what could be blamed, apart from my inexperience in this area, is the yeast.

I used a dried fast action bread yeast. And to be honest, I am not still sure how to use it properly.


I have ever only used a fresh yeast. It was the only form of yeast I could buy in Czech Republic. I can confess here, it was not always the best success neither. I can very clearly remember the day, when I called my mum to ask her, how should I activate my yeast. I got the answer that fresh yeast is a living organism and it must be handled in the right way in order to work properly. For example, it needs food to become active and its favourite food is sugar. Than it needs warmth and moist. And the warmth is really meant to be warm not hot, as I found out lately.
After a half an hour when my yeast was supposed to proof it is still alive and active by producing little bubbles, nothing really happened. The surface of my yeast liquid was still, mirror-like. Not a good sign. I called my mum again, describing the state of the yeast. "You killed it...!", I heard. Gosh! "Was the milk warm or hot?" she asked. Well, it might have been a little bit more warm, maybe hot? "Oh yes, you killed it!", she said. "Ok, what am I supposed to do know?", I asked. "It is dead now, you have to start again." Luckily, I only used a half of it, so I started again. I made sure the milk was really only warm, not hot. And it worked! Yippee!! :)


I should have probably said, that the bread was actually quite good, definitely tasty, though it was a bit tough for my taste. I think the dough did not rise properly. Anyway, for the first try not that bad result. Definitely not bad enough to keep me away from trying again!

Here is the recipe I used.

Seedy bread

250g strong bread flour
150g wholemeal bread flour
50g pumpkin seeds
50g sunflower seeds
2 dl lukewarm water
7g dried yeast
1 tsp ground coriander and ground cumin
1 garlic clove, crashed
1/2 tsp salt

1 Mix the yeast and water and let the yeast to dissolve. In a bowl mix together both flours. Add the salt, spices and garlic. Pour in the mixture of the yeast. Stir well and knead the dough for 15 minutes until smooth. Now add the seeds, and knead to incorporate. Sprinkle the dough with flour, cover with a towel, and let rise for an hour in a warm place until it is doubled.

2 Divide the dough to two portions and form two loaves. Place the loaves on a baking tray lined with a baking paper, and let the loaves to rise again for about 20 minutes.

3 Bake in a preheated oven to 170C for about 40 minutes.